
Alright everyone, I have my FIRST tutorial..
Keep in mind.. first so go easy on me haha -
I'm sure it's too wordy, the pictures aren't the best and many other things..
but hey, gotta start somewhere!
I'm sure it's too wordy, the pictures aren't the best and many other things..
but hey, gotta start somewhere!
Christmas Table Runner

The runner I will be showing you is approximately 56"x14.5"
I recommend reading through the tutorial first, then adjusting to meet your table needs.
In advance, I apologize for the darker photos - if you have any questions/problems don't hesitate to contact me and i'll help in any way I can!
Materials-
- 9 strips from a honey bun of your choosing (or just cut (9) 1 1/2 inch strips)
- 3/4 yard of white fabric
- 1/4 yd binding fabric
- 1 5/8yd backing fabric (less if you don't mind having a non-continuous piece)
- (4) 1.5" wide by WOF pieces for 2nd border
- 1 5/8 yd batting
Process-
Okay, so you're going to want to take your white fabric and cut (13) 1.5" by WOF inch strips.

Then, take one strip of your holiday fabric and one strip of white fabric
sew right sides together.
Sew all 9 of your holiday strips together with white strips.

Your pile should start to grow
(Put the extra 4 white strips to the side, these will be your first border later)

Press all of your strips open.
I pressed them towards the holiday fabric, but whatever your preference will be fine.

Your strips should measure 2.5 inches across.
Trim if necessary.
Take one of your strips and cut it into 2.5 inch squares.


Continue cutting all of your strips in this way.

Each strip should yield about 17 squares

Pretty little piles!
Begin to lay out your runner.
I used 8 squares per row which allowed me 2 rows per fabric pile.

I recommend laying out your design and leaving it there while you're sewing
It will help avoid confusion.
If you've ever sewed zig-zags before you know we'll be sewing on a diagonal.
This picture shows what I mean
Start at the top right corner and sew the squares together to make your "rows"

I tend to like chain stitching, so I lay out my pieces in order.. again, up to individual preference!


All of my "rows" sewn together.
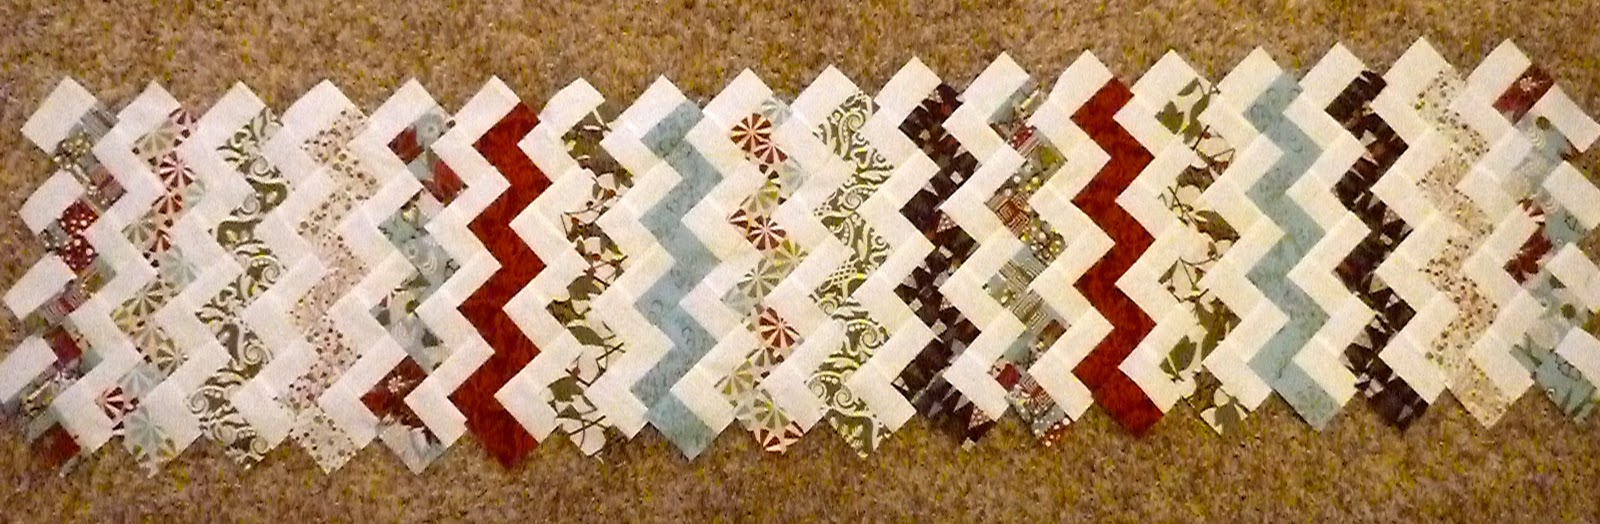
My pictures are going to move to the floor because my table was far too small!

Just to show you how much it really shrinks down.
My initial runner was 15 rows long. (48"x14.25")
This one I'm showing you will be 18 rows long. (56"x 14.5")


Don't be concerned if you think your runner starts to curve
Mine did the whole time, but it turned out the right way :)
Okay! "Rows" are ready to start combining!!
We're going to work on a diagonal again and sew our rows together this way..
Again, start in the top right corner

Be super careful and line up your fabrics!
Your points won't look good unless they're crisp and matched nicely

I tend to prefer to pin my "rows" on the parts that should match up to keep me aware while i'm sewing

More lining up on the next row..

Again, personal preference to line up all my rows and pin them to chain sew.

Once you have your rows sewn together, press them open.

All lined up with our first sewn rows completed.

Continue lining up your pieces and sewing them together until your runner is completely sewn together!


Phew! Still with me??

Okay, now we're going to square off the runner so it'll be nice and rectangular!
Line up your ruler with the middle points and cut them off.


Continue with the other sides, square as needed!


Once you get to this point you will take your 4 white strips leftover and sew on your first border.
(Depending on whether you went with the 15 rows or 18 you may have to join your strips together to make them long enough)

Press the seams open.

Take your (4) 1.5" border strips and apply it the same way you did the white
and press them open.


There you have it!
Completed table runner topper!
Ready to be quilted and bound by your preference
Any thoughts/questions about how I can improve this tutorial are greatly appreciated.
Please though, constructive criticism?
(totally aware that I need to work on my picture skills haha)
:)
Copyright Knotted-Thread 2011. You are welcome to use these tutorials for personal use. You are not given permission to use my pictures or my words without giving me credit and linking back to the original and you are never allowed to copy an entire tutorial or post. Anyone copying or selling my tutorials is guilty of copyright infringement.

this is a great tutorial and i will link it in a post this week. the runner is just lovely!
ReplyDeleteGreat tutorial! I used a method similar to make a stocking last month. Now I might just have to go make a table runner too :)
ReplyDeleteThis is really well done! I can totally follow you. Photos are a great help. Thanks, J!
ReplyDeletePS - your nails are lovely :)
oh I think you did great! I just posted my first tutorial this week too, so I know how you feel!! Your runner is really cute, too!
ReplyDeleteThanks for the tutorial. I love zig zags!
ReplyDeleteAwesome tute!!! I think I am going to try this!!! :)
ReplyDeleteGreat job on the tutorial :o) For the photos, see if you can get a white sheet for a backdrop, that will help lift them from the gloom
ReplyDeleteWow, your 1st tutorial, it's excellent. I didn't realise it was made like that. Thanks!
ReplyDeleteWhat a fun table runner. Thanks for posting the tutorial.
ReplyDeleteGreat tutorial, Jenn! I'm going to bookmark this for gifts next year. I figure if I get them started early enough in the new year I just might be able to finish them!
ReplyDeleteAwesome job!! Very pretty too! Thanks for sharing.
ReplyDeleteP.S. Am book marking this one!
ReplyDeleteNice job! The only question I would have is: when cutting off the points, where exactly do you place the ruler horizontally (at the points or 1/4" away?) Thanks for a cute idea!
ReplyDeleteGreat tutorial. Nice to see someone already working on Christmas. I'm still recovering from last Christmas' projects.
ReplyDeleteGreat tutorial - fun to read your first!
ReplyDeleteI LOVE the project and am bookmarking it. Good job on the tutorial! It's also fun to see your fabrics because they're other colorways of a Christmas table topper I'm finishing right now!
ReplyDelete