Sorry for the delay in posting this!!
You requested, and I delivered!
My tutorial for making these wine coasters
I used coordinating prints from Modern Yardage
Materials:
- (4) 5" squares for the bottom of your coasters
- (4) 5" squares for each of your coasters (these will be the top)
- CD (old one that might get ruined!)
- pen
- iron
- sewing machine
First, figure out which prints, coordinating prints you want for each of your coasters and trace your CD onto the wrong side of your fabric. Since I used 2 colors for each coaster I traced 2 onto each fabric.
Go ahead and cut them all out, including your bottom pieces
Next, your going to use your iron to fold all of the top pieces in half.
Leave the bottom pieces off to the side for now.
Now, we're going to start assembling your coasters.
Take your bottom coaster piece and one halved fabric and place it on the bottom..
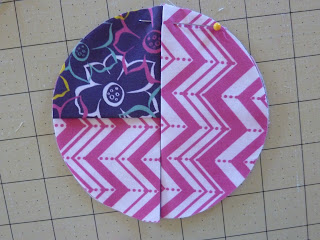
You're going to continue adding pieces in a clockwise motion
When you get to this point, I tend to pin where my left and right (pink) pieces meet
Now, for the last piece you're going to lift the first piece and put it under
Continue to pin all the intersections
(it will help later when sewing to avoid shifting)
You're going to sew around the edges using a 1/4" seam allowance
Once you get all the way around, turn the coaster inside out and use your fingers to push out the seams
Voila! One down, however many more to go till you get your set!
These make a great housewarming gift for summer barbecues!
Thanks again to Modern Yardage for the gorgeous fabrics!
To read my full post/review on their fabrics check out the initial post
here
This tutorial is for personal use, please do not sell items made using this tutorial
:)


